just an old-fashioned girl

Hello and welcome. I'm glad you dropped by. If you´re looking for something a little nostalgic of bygone eras with a timeless elegance and a little modern twist – in other words, something slightly “retro” – then you should feel right at home here in my shabby chic room. Month by month, there will always be something new to see so I hope you´ll enjoy your stay and come back again soon.

Showing posts with label old photo. Show all posts

Friday, September 26, 2014

Grey Days And Sepia Photos

Most of September has been warm and sunny without the suffocating humidity of summer and, as usual, the garden has been calling my name and, as always, I´ve been responding. It couldn´t last of course but I made the most of it while the weak autumn sun was shining. The past week though has been mostly rainy with horrific thunder storms with a sound like large pieces of furniture falling downstairs. At the first indication of a storm I always raced around the patio grabbing my beautiful gerbera daisies and putting them in a sheltered place where they couldn´t be battered down by torrential rain. Ditto Dora who´s always reluctant to come indoors in any weather!

So much for outdoor activities. When the weather´s really bad like today I find the best way to forget about it is to do some photo editing.

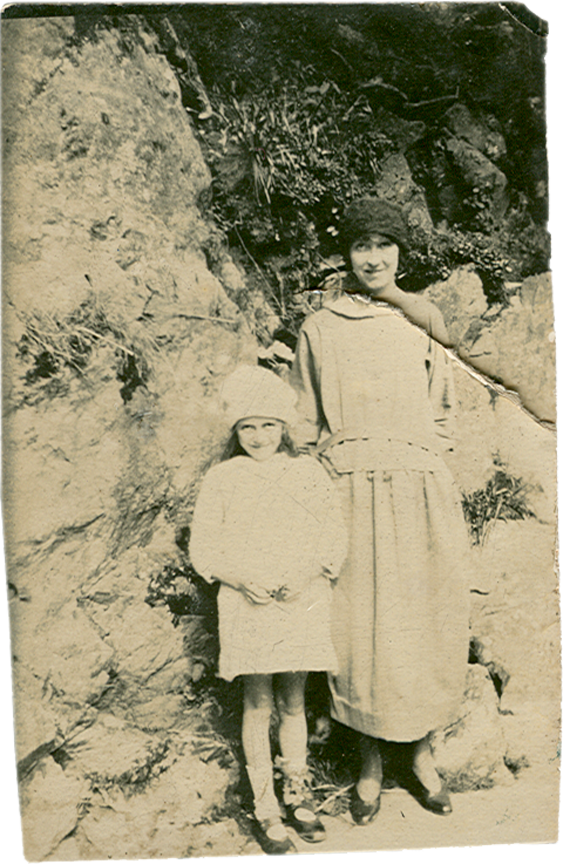
Some of you may remember that I had to fly to Scotland on Christmas Day to arrange my mother´s funeral. It was a sad occasion made even sadder by the discovery of several photos of my mother which must have lain forgotten at the bottom of a drawer for many years. I brought them home and put them away and it´s only now that I can bear to look at them. There´s one I´d never seen before which I find particularly appealing in which she´s standing in a garden, obviously so aware of the fact that she´s been told not to move that she´s standing at attention like a little soldier. 

As you can see, considering how old it is, the photo is remarkably undamaged.
However, it´s very faded and has very little contrast. I´m no expert at photo restoration and usually have to resort to lots of tedious and frustrating trial and error (mostly error) so I was amazed when I immediately discovered that Auto Tone worked instantly by adding the necessary contrast.
Unfortunately, it also meant that the photo lost some of its vintage sepia colour in the lighter parts like the dress and the sky. Again I was amazed that my very first attempt, namely the use of the sepia photo filter, restored just the touch of the warm colour it needed while toning down the rest of the photo.
After studying it for a while with a critical eye it occurred to me that all those little spotty white dots in the foreground rather distracted the eye from the focal point. I used a combination of the appropriately named spot healing brush and the clone tool to edit them out...and that was it really. What I deliberately didn´t do was try to remove all the blotches and scratches, mainly in the sky, only those which were distracting as I´ve learned from experience that overworking an old photo can deaden it. Anyway, for better or for worse, here´s the final result.
I know that all vintage photos aren´t as easy to improve as this one – you may remember my struggles to edit THIS horror! - but if you´ve never even attempted to edit a photo I hope this will inspire you to at least give it a go.

Sunday, January 26, 2014

Knowing When To Start

I´ve often said that an important part of photo restoration is knowing when to stop because if you overwork a photo you can lose as much as you gain. By that I mean you can smooth it out, clean it up and eradicate all its major faults and in the process simply ensure that it takes on a completely artificial character.

With the following photo knowing when to stop was not a major concern. Well, not for many years because it was one of these projects I kept attempting and almost immediately gave up in frustration. I just knew that it wasn´t the right time to start.
See what I mean? For many years I just didn´t have the necessary expertise to tackle something so horrendous. For a start that deep diagonal crease was totally intimidating and the longer I looked at it the less confidence I had that I´d ever be able to remove it. I finally put the photo away and forgot about it. In the meantime I had enough old damaged photos to keep me occupied. Just recently I was looking through all my previous restoration work and realised that many of my old family photos had been just as badly treated and yet I´d somehow managed to restore them, if not to perfection at least to a reasonable condition so I dug it out again and had another look at it. First of all I desaturated it. I suppose that wasn´t really necessary but I find it far easier to repair faults in a black and white image. 
After that I straightened the edges and then used a combination of the clone tool and the healing brush tool to remove the crease. I know that this sounds easy but, believe me, it wasn´t! It took a lot of trial and error before I was happy with the result.
The next step was to conceal the black edges but that was easily done using the clone tool which I also used on the missing part of the shoe. Next I restored the photo to its original sepia. Well, not quite its original which looked rather too yellow to me. (See Tutorials) I also altered the shadows and the highlights. 
After that I cleaned up that messy looking sock using the clone tool. The photo still looked rather flat so I also deepened the contrast.
In my final version I decided to use a darker brown overlay. I then increased the contrast using Curves which brought out the detail. This also had the effect of increasing the visibility of the scratches. 
Did I just say that was my final version? Well, it may be but I couldn´t resist trying out an even darker overlay to give it more depth.
As you can see from the above, it took a lot of trial and error to restore this old photo. I´m still not entirely happy with it but at least it looks a lot better than the original. I suppose I could remove those scratches but, as I said before, you have to know not only when it´s time to start but also when to stop!